Your cart is currently empty!
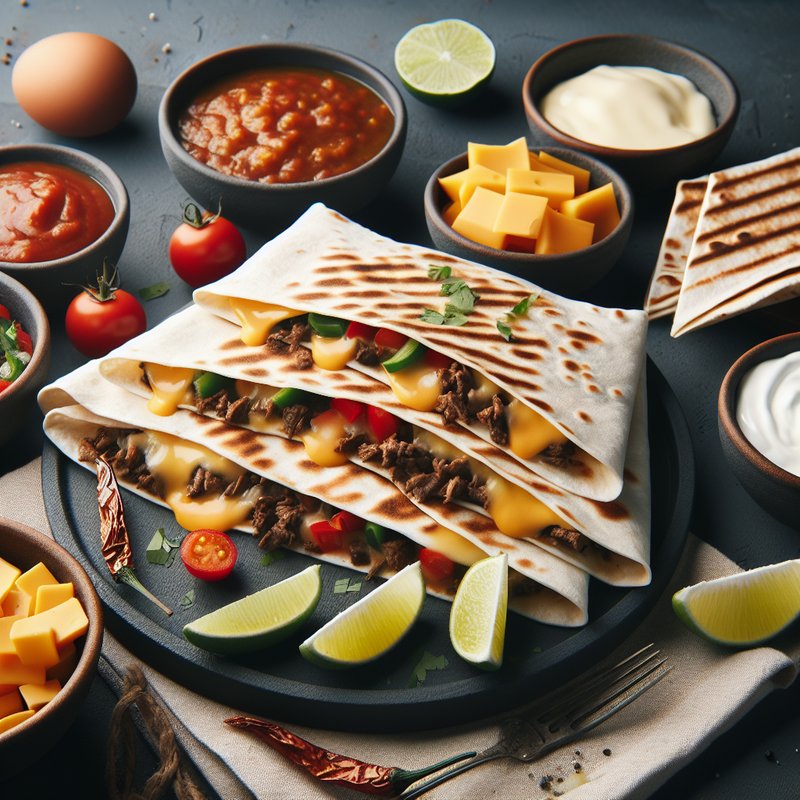
Smashburger Quesadillas: Crispy, Cheesy, and Loaded with Flavor

Smashburger Quesadillas: The Ultimate Loaded Quesadilla Recipe
There’s something special about combining two beloved comfort foods: juicy smashburgers and crispy quesadillas. This recipe brings together the best of both worlds—perfectly seasoned beef, melted cheese, and all your favorite burger toppings, all wrapped in a golden tortilla. Whether you’re feeding a crowd on game day or looking for a quick weeknight dinner, these Smashburger Quesadillas are sure to become a family favorite.
Why You’ll Love This Recipe
- Ultimate Flavor Combo: The blend of seasoned beef, gooey cheese, and crispy tortilla creates an explosion of taste in every bite.
- Quick & Easy: Ready in about 20 minutes with minimal prep, making it ideal for busy evenings.
- Versatile Toppings: Customize with your favorite burger add-ons—lettuce, tomato, pickles, onions, or special sauces.
- Crowd-Pleaser: Perfect for parties, game nights, or casual dinners; both kids and adults will love them.
Key Ingredients
- Ground Beef: Use 80/20 blend for optimal flavor and juiciness.
- Flour Tortillas: Large ones work best for easy folding and holding all the fillings.
- Cheese: Cheddar or American cheese melts beautifully; feel free to mix in Monterey Jack or pepper jack for extra flavor.
- Seasonings: Salt, pepper, garlic powder, and optional onion powder or smoked paprika.
- Toppings: Diced tomatoes, shredded lettuce, sliced pickles, onions, ketchup, mustard, or burger sauce.
Step-by-Step Instructions
- Prepare the Patties: Place a portion of ground beef (about 2-3 ounces) on one half of each tortilla. Season generously with salt, pepper, and garlic powder. Press the beef flat with your hand or a spatula.
- Cook the Beef: Heat a skillet over medium-high heat. Carefully place the tortilla beef-side down in the skillet. Cook for 2–3 minutes until the beef is browned and crispy.
- Add Cheese: Flip the tortilla so the cooked beef side is up. Sprinkle shredded cheese over the beef and fold the tortilla in half.
- Crisp the Quesadilla: Cook for another 1–2 minutes per side until the tortilla is golden and crispy and the cheese is fully melted.
- Slice and Serve: Remove from skillet, let cool slightly, then cut into wedges. Serve immediately with your favorite toppings and dipping sauces.
Pro Tips for Perfect Results
- Hot Skillet: Ensure the skillet is hot before adding the tortillas to achieve a crispy exterior.
- Don’t Overcrowd: Cook one or two quesadillas at a time to maintain even heat.
- Press Down: Use a spatula to gently press the quesadilla while cooking to help the cheese melt evenly and create a uniform crispness.
- Customize Seasoning: Add a pinch of cayenne or chili powder for heat, or taco seasoning for a Mexican twist.
Delicious Variations
- Veggie Delight: Replace beef with a mixture of black beans, corn, and bell peppers. Add avocado slices after cooking.
- Spicy Kick: Add sliced jalapeños or a drizzle of sriracha to the beef before cooking.
- Breakfast Quesadilla: Substitute beef with scrambled eggs and use pepper jack cheese. Serve with salsa.
- BBQ Style: Mix BBQ sauce into the beef and top with caramelized onions and cheddar.
Perfect Pairings
Serve your quesadillas with a side of sweet potato fries, a crisp green salad, or coleslaw. For drinks, try a refreshing lemonade, iced tea, or a cold beer. A light dessert like fruit sorbet or cheesecake balances the savory flavors.
Make Ahead and Freezer Instructions
- Make Ahead: Assemble the quesadillas (without cooking) and refrigerate for up to 24 hours. Cook when ready.
- Freezer: Place uncooked, assembled quesadillas in a single layer in a freezer bag, separated by parchment paper. Freeze for up to 3 months. Cook from frozen in a skillet over medium heat, adding a few extra minutes.
Serving Ideas
Arrange the quesadilla wedges on a platter and top with diced tomatoes, shredded lettuce, pickles, and a drizzle of burger sauce. Garnish with fresh cilantro or parsley for a pop of color. Serve with small bowls of extra sauces like ketchup, mustard, or ranch dressing.
Storage and Reheating
Store leftovers in an airtight container in the refrigerator for up to 3 days. Reheat in a skillet over medium heat until crispy, or in a toaster oven. Microwaving works but may soften the tortilla.
Frequently Asked Questions
- Can I make these gluten-free? Yes, use gluten-free tortillas.
- What other meats can I use? Ground turkey, chicken, or even shredded pork work well.
- How do I make them spicier? Add spicy cheese, jalapeños, or a dash of cayenne.
- Can I grill them? Yes, cook on a preheated grill over medium heat for 2–3 minutes per side.
- How do I keep them warm for a party? Place cooked quesadillas on a baking sheet in a 200°F oven until ready to serve.
- Can they be eaten cold? They are best warm but can be enjoyed cold as a snack.
- How many does this recipe make? This recipe yields 4 large quesadillas (8 servings as appetizers).
Nutrition Information
Note: Nutritional values vary based on specific ingredients and portion sizes.
A Final Thought
Cooking is about sharing joy and creating memories. These Smashburger Quesadillas bring together familiar flavors in a fun, interactive way. Whether you’re cooking for yourself or a crowd, this dish is sure to bring smiles to the table. Enjoy the process, experiment with toppings, and make it your own!

Leave a Reply